
| Greg's problems with Canon 9900F scanner |
|
|||||||
|
|
|
|
||||||||||||
This page illustrates the problems I have had with my Canon “CanoScan” 9900F scanner, which I bought for the express purpose of scanning in old slides and negatives. This scanner was advertised for exactly this purpose.
Most of the images on this page are reduced in size; to see the originals, click on the image in question with the mouse.
Briefly, this scanner does not do the job I bought it to do. I have tried to get Canon to fix it or supply documentation so that I can fix it myself. They have done neither. After many attempts to solve the problem, I have given up and am returning the unit.
This means that I am looking for a new scanner. If you are very happy with your scanner, please let me know about it. If you represent a scanner manufacturer, I'd be interested in hearing from you too. In either case, I won't publish your messages without your consent.
In more detail: the scanner seems to work perfectly adequately from a hardware perspective. Unfortunately, the only way to interface to the scanner is via the Canon-supplied ScanGear CS driver, which has serious bugs. It cannot reliably recognize slides for scanning. Canon has acknowledged the issues and stated that it might take up to within six months to fix them. Instead, they offer a “workaround” which doesn't work.
They write:
Unfortunately, it seems clear that we are unable to satisfy your expectations with regard to the productThen then offer to replace it.
These expectations are based on their advertising, which I consider to be knowingly misleading. As of 7 August 2004 their web site states:
With a fast USB 2.0 Hi-Speed/FireWire (IEEE1394) dual interface, the CanoScan 9900F can capture reflective prints, 35mm filmstrips or slides, and up to 5" x 4" large format films at high-quality 3200 dpi optical resolution. A comprehensive software package, including Adobe PhotoShop Elements 2.0 ensures ease of use and professional results every time.
This is either very misleading (“can capture” could be interpreted as “can sometimes capture”) or knowingly incorrect.
I have lodged a complaint about the matter with the Australian Competition and Consumer Commission and have asked Canon to retract any advertising suggesting that this scanner is suitable for scanning slides.
The problem wouldn't be nearly so bad if Canon were prepared to document the hardware: then people with more ability or motivation than Canon's own programmers would be able to write software to use it. Unfortunately, Canon seem to believe that this kind of information is of such value that they categorically refuse to release the information. I have previously asked Canon to:
They have refused to do either. I was not interested in returning the unit, in which I have invested a large amount of time and effort, but it seems to be the only alternative.
This incident has had one definite result: until I see some change of direction at Canon, I will not buy any more of their products. In my opinion, the advertising is misleading, and they do not have the understanding or the good will to do anything about it. Against such odds, the fact that they make quite good hardware is irrelevant.
The good news is simple: it's possible to scan with the software. If you're lucky, you'll get a thumbnail image like this:

This shows, roughly, thumbnail images of the 8 slides in the machine. It's still not perfect: it's difficult to see on the tiny images that the software provides (click on the image to get the 1024x768 original), but slides number 5, 6, 7 and 8 have a black band at the bottom. This is a relatively benign symptom of the problem: the software can't recognize the boundaries of the slides, even when given well-defined slides like this. You can compare the thumbnails with what the scanner scans by unticking the box “Display thumbnails” on the right. This then gives:

In this view, slide 1 is at top left, slide 4 bottom left, slide 5 top right, and slide 8 bottom right. There's nothing obviously wrong with the slides on the right-hand side; in particular, slides 7 and 8 are very well defined.
This framing isn't just a cosmetic issue: the scanner uses it to decide what to do during the final scan. For example, compare the raw scan and the finished image here:


There's no excuse for this kind of breakage, but fortunately it's usually possible to fix it with software like xv, as long as the exposure hasn't suffered too much as a result.
The previous section shows the best you can expect from the software. I have never seen a case where it recognizes all 8 slides correctly. In the following example, it's completely baffling that the software thinks that the slide is the other way around:

This problem isn't because the slide is inserted in landscape format: the software does cater for that, and it frequently makes the opposite error and assumes that portrait slides are in fact landscape.
Things get a lot worse if the slides have an even marginally dark background. In the following example, the scanner has managed to decide that frame 5 is the wrong way round:

If you move to the raw display, everything looks fine. It sometimes helps to turn the slide in question through 90°, as has been done in this example. The images look good, and the scanner appears to have been able to locate the first slide correctly, to judge by the frame around it. Note that it has been told that the scanner contains 35 mm slides (field on the right).

Sometimes this works, in other cases things go to hell, as in this example. Returning to the thumbnail screen we find:

Here the software appears to have decided that these are negative strips, although it has been told that they're slides. This is confirmed if you go back to the full view: the field now shows 35mm strip, though nobody has changed it. In other words, instead of taking the advice as to the kind of film in the scanner, it not only ignores it but changes it. What use is that?
To add insult to injury, when you return to the raw view and try to change it back again, it insists on clearing the previews:

It didn't do that when converting (without permission) in the other direction. Note also where it has moved the frame in this example. It's hardly even worth mentioning the bad grammar of this particular message.
I don't know how the algorithms work (or in this case, are supposed to work), but it seems probable that they recognize edges. In this case, this software has failed catastrophically: it has ignored the information at its disposal and spread the real edges of the slides around the “thumbnails”.
One theoretical workaround is to scan in the entire set of images as one image and use real software to dissect them later. That doesn't really work: the driver includes the black frames in the exposure calculations, resulting in a really washed-out image. You can also mark the frames individually and scan them like that. The latter takes for ever, and due to the low resolution of the thumbnails, about 50x70, it's also prone to incorrect exposure. The fact that the software chooses a line cursor for this function also makes things more difficult.
At the very least, this bug is a nuisance. But this kind of nuisance seems to be normal in the Microsoft world. It's more than a nuisance, though: at the very least, it means:
The exposure is usually not correct.
Having to rescan individual slides makes it really easy to get the slides out of sequence.
After a week of messing around with this software, I decided to contact Canon. They don't publish an Email address, so I called the local service phone line. After 5 minutes of waiting, was connected with a service representative who identified himself as Ejaz. He took some time to understand my problem report, but then suggested, in succession:
I responded that the symptoms were indicative of a software problem, and that service wouldn't be able to help.
Uninstall driver and reboot the machine.
I asked him why, and he said that maybe some parameters had got mixed up. OK, this is Microsoft, so maybe it might work. He told me—correctly—how to “uninstall” it, and I did so and rebooted. To my surprise, the driver “reinstalled” itself. I wonder what “uninstall” means. The problem didn't go away, of course.
Try a different program to access the driver. I had been using a program which identified itself with the descriptive (or is that “intuitive”?) name ArcSoft PhotoStudio 5. I also had another CD with a program called Adobe Photoshop Elements 2.0, which I had not installed because it had asked for a serial number. After a bit of searching, found the serial number in the waste paper basket on the paper envelope in which the CD had come (I had since put the CD in a jewel box). Installed that, and of course it didn't make any difference: it called the same driver, which was as broken as before.
Next, Ejaz asked me to try a different computer.
I asked him why, since this was so obviously a software problem, and he said that it might be a problem with my computer (which has performed flawlessly despite the Microsoft software on it). I told him that I didn't have another computer (not true, but the last thing I want to do is to install Microsoft on another machine, and in any case, that would be in breach of the license). I asked him, if that attempt were to be unsuccessful (i.e. the same problem would continue to occur), whether he would then ask me to go interstate and try it there.
He replied that Canon second-level support wouldn't accept a report until we had gone through all these steps. That at least sounds plausible. I asked him whether Canon in Adelaide could do this, but no, they're not prepared to do that. But they expect that of a customer. Finally we came to the conclusion that I would send him a mail message with a detailed problem description. That's this web page, which has taken me three hours to put together. At my consulting rate, that's worth $750, more than the scanner.
Ejaz, as discussed on the phone on Friday, I'm attaching a problem
report for the CanoScan 990F that I bought on Friday, 30 April.  The
page is a copy of , and
the images all link to that file.  Please let me know if you have any
difficulty accessing the document, or if you need any additional
information.

You'll note the comment at the top:

I am asking Canon to:

  *    Supply a functional driver, or
  *    Supply technical documentation so that I can write my own.

  I would prefer for them to do both.  I am not interested in
  returning the unit, in which I have invested a large amount of time
  and effort.

Please let me know by Friday this week how you intend to solve the
problem.
Later in the day, Glenn Thomas send me a message pointing to a Net News discussion of exactly this problem. And here's Ejaz claiming that this has never happened before.
It's been a week since I sent my message to Ejaz, and several days since I expected a reply. Neither happened, of course. A new mail message:
On Monday, 10 May 2004 at 18:07:23 +0930, Greg Lehey wrote:
> Ejaz, as discussed on the phone on Friday, I'm attaching a problem
> report for the CanoScan 990F that I bought on Friday, 30 April.

Ejaz, I haven't had any confirmation that you got this message, beyond
the server log:

May 10 18:07:23 wantadilla postfix/qmgr[43990]: 47A3F51675: from=<grog@lemis.com>, size=17314, nrcpt=1 (queue active)
May 10 18:08:38 wantadilla postfix/smtp[71056]: 47A3F51675: to=<ali_ejaz@canon.com.au>, relay=homx.canon.com.au[203.37.123.106], delay=75, status=sent (250 Ok)

I remind you that I consider Canon in breach of contract for supplying
faulty software.  Please respond *today* confirming that you have
received this message and that you can fix the problem by Friday of
this week, or explain why you cannot meet this deadline.  If you do
not do so, I will have to take further action.

I'm leaving the rest of this text here in case you have missed it.
You'll be interested to know that the web page has generated a lot of
interest, including information that--despite your claims--this
problem is well known.  See http://tinyurl.com/yt6w9 for further
details.
This did bring some reaction: a reply from Ejaz, stating that he had received my message, but not addressing the other issues (isn't that so often the way when people answer the wrong way round?), and a call from Mitchell in Sydney, who told me that he had been able to reproduce the problem, that he had escalated it to Japan, and that he hoped for a response within a week. Interestingly, he drew a lot of attention to the fact that he had tried it on two different computers with two different mother boards (both presumably Microsoft-based) and also on an Apple. Maybe they do have a lingering suspicion that it could be a problem with the computer hardware.
Date: Wed, 9 Jun 2004 10:46:56 +0930
From: Greg 'groggy' Lehey <grog@lemis.com>
To: ALI_Ejaz@canon.com.au
Subject: Re: Problem report: ScanGear CS driver for "CanoScan" 9900F

[-- PGP output follows (current time: Thu Jun 17 12:21:30 2004) --]
gpg: Signature made Wed Jun  9 10:46:56 2004 CST using DSA key ID 507A4223
gpg: Good signature from "Greg Lehey <grog@lemis.com>"
gpg: WARNING: This key is not certified with a trusted signature!
gpg:          There is no indication that the signature belongs to the owner.
Primary key fingerprint: 9A1B 8202 BCCE B846 F92F  09AC 22E6 F290 507A 4223
[-- End of PGP output --]

[-- The following data is signed --]

On Tuesday, 18 May 2004 at 13:03:31 +1000, ALI_Ejaz@canon.com.au wrote:
> At 18/05/2004 10:20 AM [time zone missing], Greg 'groggy' Lehey <grog@lemis.com> wrote:
>>
>> I remind you that I consider Canon in breach of contract for supplying
>> faulty software.  Please respond *today* confirming that you have
>> received this message and that you can fix the problem by Friday of
>> this week, or explain why you cannot meet this deadline.  If you do
>> not do so, I will have to take further action.
>
> Yes i got your email, & im in the process of getting a
> response.  Hopefully i can get an answer soon.

Ejaz, three weeks ago I was given a week for some kind of feedback.  I
have heard nothing.  In the meantime, I have had to stop work with
this machine due to the high effort required and the inferior scanning
results.

In this connection, I note also that I have not been able to get
images with a higher pixel depth than 24.  According to the data
sheet, and one of the reasons I bought this scanner, it should be 42.
Please explain how I can get 42 bit images with this scanner.
In fact, I was wrong. The product specification states a 48 bit resolution
Please also ensure that:

1.  I hear *today* what the current state of play is.
2.  I get an assurance that, by this time next week, I will have a
    solution, either in the form of an updated driver or in the form
    of documentation which will enable me to write a bug-free driver.

If the second deadline expires, I shall issue formal complaints with
the ACCC and the SA Bureau of Consumer and Business Affairs.

I remind you again that you have now been in breach of contract for
over a month, and that I am not interested in an exchange.

Greg Lehey
Date: Wed, 16 Jun 2004 12:15:29 +1000

Hi Greg

I just did a search on "problem scanning slides 9900f" and came up
with "Results 1 - 10 of about 495", of which your page was the first.

I too bought the 9900F "for the express purpose of scanning in old
slides", and it has been a pretty daunting experience.  As a very
experienced computer user, tinkerer even, I have managed to work my
way through the minefield, but heaven knows what an
inexperienced 'plug and play' user would do.

I have a Mac (iBook G3).  I set the scanner up using the disks that
came with the machine, and using the USB cable.  The software I used
(PhotoStudio, with the ScanGear driver) intermittently recognised the
scanner, if I turned the scanner off and on between scans.

Using a FireWire cable, it never recognised the scanner at all.

My first scan on Google discovered that the original Mac drivers never
worked with OS X, or something equally disappointing.  So I downloaded
all the current OS X drivers from the Canon website.

I uninstalled everything that the original installation had placed at
various points of my disk (but the uninstall software wouldn't work,
so I had to do it manually, finding all the preferences locations and
application locations myself - thank heavens I didn't have to search
through a Windows registry!).

I installed Adobe Photoshop Elements 2.0 (which actually isn't a bad
bit of software), the new ToolBox for OS X, and finally the drivers,
and rebooted.

Using the FireWire (I haven't yet used USB - why would I bother?), it
now works! ....  well ...  it scans, and I can get results.

But I now have the challenge you describe.  It has in fact recognised
three complete scans of eight slides correctly, but the fourth it
couldn't manage, and instead thought it had strip film in there, as
you also mention.

I shall continue the effort this evening, but I am really wondering
how long Canon can get away with touting this thing as a great film
and slide scanner!
No reply from Ejaz. I tried calling Mitchell a couple of times on the number he gave me (02 9805 2778), but nobody answered the phone. Spent some time looking for the customer service number, which once again required using a lot of guesswork to enter the correct product categories (it's here, and the phone number in South Australia is 08 8201 9222).
Called that number round 12:30, and was connected to Alison, who had never heard of Ejaz. She has been with Canon for less than three weeks; presumably Ejaz has been gone for longer than that. With that sort of turnover, the moral of the story is obviously not to leave things too long before complaining.
She wanted me to go through the whole problem description all over again, which I refused. Then she said if it was with second level support, there was nothing she could do. I suggested that a company address or a problem resolution would be a good idea. She put me on hold and came back with an address: Canon Australia, Customer Service Decision, attn Menna Soni, POB 313, North Ryde 1670.
I asked if this meant that they didn't intend to resolve the support issue, and she said she would check. She asked for a report number, which I didn't get, and then asked for my name and looked for a report by name. She didn't find it, not surprisingly, since she had written down just about everything wrong: she had my name as Ray, and had written down the URL of this page as http:\\www.elmis.com/prog/Canon-breakage.html. She couldn't give me a phone number for Menna, and she couldn't connect me to her manager nor to her supervisor, although she claimed to have just spoken with the latter: she was “on the phone”. She didn't ask if I were prepared to wait. I corrected the URL, asked her to check it and to get somebody to call me back within half an hour.
An hour later I still had no reply, and nobody had accessed the web pages, so I called back and was connected to Mohammed. Alison was not available, and neither was their supervisor. Mohammed put me on hold, and I was able to speak to Alison relatively quickly. She had (again) misunderstood the URL, and had been looking for http://www.lemis.com/grog/CANON-breakage.html:
homx02.canon.com.au - - [17/Jun/2004:13:12:44 +1000] "GET /grog/CANON-breakage.html HTTP/1.0" 404 291 "-" "Mozilla/4.0 (compatible; MSIE 6.0; Windows NT 5.1)"
homx02.canon.com.au - - [17/Jun/2004:13:13:07 +1000] "GET /grog/CANON-breakage.html HTTP/1.0" 404 291 "-" "Mozilla/4.0 (compatible; MSIE 6.0; Windows NT 5.1)"
homx02.canon.com.au - - [17/Jun/2004:13:13:12 +1000] "GET /greg/CANON-breakage.html HTTP/1.0" 404 291 "-" "Mozilla/4.0 (compatible; MSIE 6.0; Windows NT 5.1)"
homx02.canon.com.au - - [17/Jun/2004:13:13:16 +1000] "GET /greg/CANON-breakage.html HTTP/1.0" 404 291 "-" "Mozilla/4.0 (compatible; MSIE 6.0; Windows NT 5.1)"
homx02.canon.com.au - - [17/Jun/2004:13:13:21 +1000] "GET /greg/CANON-breakige.html HTTP/1.0" 404 291 "-" "Mozilla/4.0 (compatible; MSIE 6.0; Windows NT 5.1)"
She had obviously done some research, though: she found that this is a “known problem”, and even that there's a workaround: put a “plastic slide” (whatever that means) in the top left and bottom right positions, and the rest should work fine. She couldn't tell me, of course, why I hadn't been informed, nor why my previous error message had been lost. She logged a message again, and this time gave me a reference number: CFR 1883.
I told her that I wasn't happy with a workaround: this is a critical bug, and there's a solution, at least for me: supply an appropriate level of documentation, and users can write their own drivers. I asked he to note this in the problem report. I also asked (again) for her supervisor to call me back by close of business today.
The other issue that I had raised in my last message to Ejaz was the question of 48 bit colour. She didn't have any idea about that, either, so I asked her to find out. She promised to send mail.
Still no response from Canon's support people, neither from Alison, who had promised information about 48 bit scanning, nor from her supervisor. Called Menna Soni at 02 9805 2000, who responded quickly and was concerned about the quality of service. As regards the scanner and the problems I'm having, he noted:
I don't want to upset Canon, so I send a couple of mail messages to Menna, offering him a compromise statement and asking for a speedy reply. After each message there was a surprising number of web hits on this site from homx02.canon.com.au, over 800 in all. Some were related to the issue at hand, but a surprising number related to personal aspects of the web site. I've kept a log here
Menna didn't reply to my mail, however, despite the passage of two deadlines. As a result, I've published the facts as I see them.
I told him that I wasn't interested in a refund: by selling a device without appropriate documentation and with defective software, I consider Canon to be in violation of the Trade Practices Act. We finished the call without coming to any agreement.
Next I called the Australian Competition and Consumer Commission and spoke to Jackie. By contrast to earlier times, she was quite interested in this particular incident, and considered that it's possible that Canon may be in breach of the provisions of the Trade Practices Act relating to misleading or deceptive conduct, or advertising on the Internet (relating to the web page mentioned at the top of this page). As far as I'm concerned, of course, it'll be difficult to get documentation if they don't want to supply it: the Trade Practices Act doesn't say anything about that.
Today I received a message from Paul Gravina, Business Capabilities Manager of Canon Australia Pty Ltd. I won't quote the original message: it was written with lines of up to 160 characters, which would be difficult to read. Instead, here's the reply, which has been tidied up and contains the relevant parts of his text:
Date: Thu, 8 Jul 2004 10:51:50 +0930
From: Greg 'groggy' Lehey <grog@lemis.com>
To: GRAVINA_Paul@canon.com.au
Subject: Re: 9900f scanner

[Format recovered--see http://www.lemis.com/email/email-format.html]

Overlong lines.

On Thursday,  8 July 2004 at  8:58:40 +1000, GRAVINA_Paul@canon.com.au wrote:
>
> Dear Mr Lehey
>
> I refer to your previous correspondence with Canon Australia with
> respect to the issues you are experiencing with the above product.

Thank you for contacting me.

> I would like to assure you that Canon Australia is taking this issue
> seriously and is doing everything it can to rectify the problem you
> are experiencing and develop a suitable solution.  In this regard,
> we wish to advise you that the matter has been escalated to Canon
> Inc, our parent company in Japan, who is responsible for the
> development of the software distributed with this product.  They are
> currently working on a possible solution and hope to be in a
> position to provide us with one shortly.  We will keep you updated
> on the progress of the development of this solution as information
> comes to hand and will of course provide with the solution as soon
> as we receive it, this may take up to six months.

I find this unacceptable.  Products should be complete before
marketing, not after.  It is, of course, possible for bugs to occur,
but in such a case I would expect a reputable company to find a timely
solution.  In a market where obsolescence is measured in months, it's
unacceptable to expect anybody to wait six months for a fix.

Note also that none of your message addresses the fact that you claim
a 48 bit pixel depth for this device, but nobody can tell me how to
achieve this.  As described at
http://www.lemis.com/grog/product-reviews/Canon-breakage.html, I asked
this question on 17 June, and was promised a reply by email.  To date
your message is the first I have received.

> In the meantime, as you know, there are a number of workarounds you
> can implement that will assist you to use the product to scan film
> negatives and slides.  We are happy to discuss these with you again
> and assist you to implement them if you wish.  If you decide to
> pursue this action please contact Sean on 02 9805 2745.

Under the circumstances, I think it would be a good idea for Sean to
contact me, preferably by Email.  As documented, I have had no success
in even getting an answer from the phone numbers given by you
second-level support people.

> If the above is not satisfactory, we repeat that we will refund the
> price you paid for the product.  Please contact us if you would like
> a refund on the product and we can make suitable arrangements for
> the return of the product and the refund of your money.

I may take up this offer, but it would be out of sheer desperation.

> Canon Australia is not able to supply you with the source code for
> the software in order for you to develop your own solution to the
> problem.  The source code for this software is proprietary to Canon
> Inc., our parent company in Japan.

I have never asked for the source code for this product.  It's
obviously not worth having: apart from the obvious bugs, it's very
difficult to use.  What I am asking for is the product specification.
This is supplied by most of your competitors; by refusing to supply
it, you are putting your customers at a disadvantage which is not
apparent until it is too late.  I also strongly suspect that your
obvious inability to support this product is at least partially a
result of this policy.  I'd like to draw your attention to
http://www.sane-project.org/manufacturers.html , which gives further
information.

Greg Lehey
I receive another letter from Paul Gravina. Again, the format is broken, so I'll just quote the reply, where I have tidied it up.
Date: Fri, 16 Jul 2004 10:41:42 +0930
From: Greg 'groggy' Lehey <grog@lemis.com>
To: GRAVINA_Paul@canon.com.au
Subject: Re: 9900f scanner

On Friday, 16 July 2004 at 11:00:17 +1000, GRAVINA_Paul@canon.com.au wrote:
>
> Dear Mr Lehey
>
> Thank you for your email of 8 July.  I note with regret your ongoing
> dissatisfaction with the 9900F scanner and with our efforts to
> respond to the issues you have raised.  Unfortunately, it seems clear
> that we are unable to satisfy your expectations with regard to the
> product.  It appears that the best course of action would be for us
> to refund to you the purchase price you paid for the product, as we
> have previously offered to do.  We encourage you to take up this
> offer.  If you wish to retain the product, notwithstanding your
> concerns about it, that is your option.  However, please note that in
> that circumstance we will not be prepared to engage in any further
> discussion of these issues.  Please let me know at your earliest
> convenience whether you wish us to refund the purchase price.

Thank you for getting back to me.  I'll consider this offer.

Does this statement mean that this product, advertised as supporting
48 bit pixels, does not in fact do so?  I have asked three different
people at Canon, yourself the last, and nobody has been able to show
how you fulfil this claim.  Independently of the question of refund,
could you please get back to me by CoB, 23 July, either personally or
via a trained support person, and either confirm that the advertising
was in error, or tell me how to perform 48 bit scans with the
equipment as it stands.

Greg Lehey
As can be seen, they're retracting to the minimum that the law requires. He doesn't even bother to try to answer my question about 48 bit pixels. Since he's the third person at Canon I've asked, and none have given any kind of reply, it suggests that this product does not, in fact, support 48 bit pixels. This would explain its particularly poor performance with slides and negatives which are not absolutely perfectly exposed. It would also be a significant violation of the advertising provisions of the Trade Practices Act. I'll be interested to see if (and if, then how) he replies.
He writes:
Unfortunately, it seems clear that we are unable to satisfy your expectations with regard to the product.
That's correct, of course, but doesn't it rather look like he's suggesting that I'm an isolated case? I strongly suspect that they can get away with that attitude mainly because most consumers don't know any better.
I receive a reply from Paul Gravina with instructions on how to set 48 bit colour depth. Didn't have much time to do anything with it; see below.
Today I finally got back to looking at the scanner again and confirmed that the 48 bit mode works. The “workaround” doesn't:
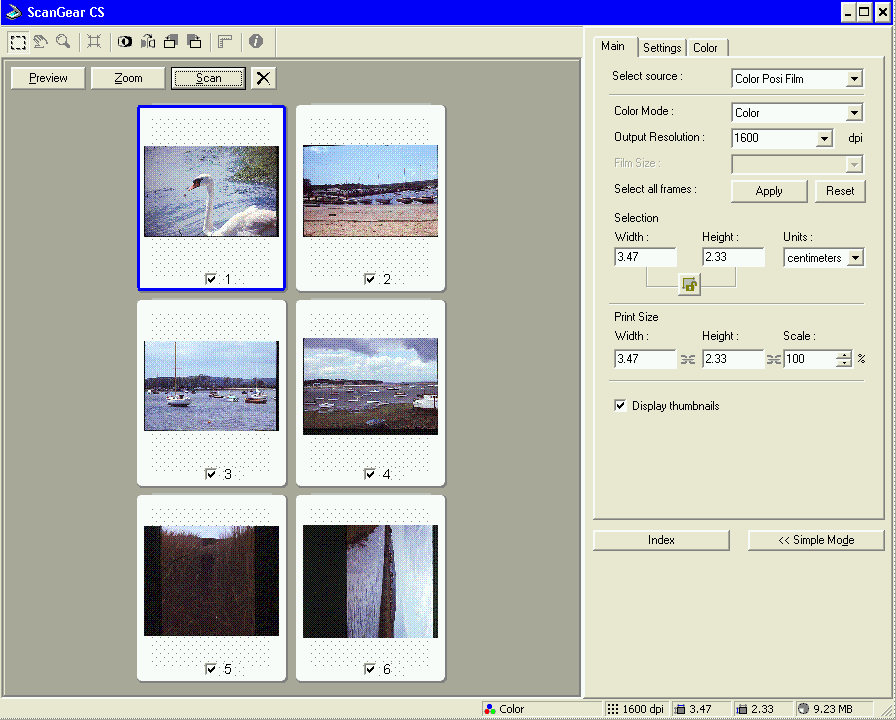
The poor picture quality here has nothing to do with Canon. It's because it was done under Microsoft “Windows XP Professional” with a remote desktop, which Microsoft limits to 8 bit colour. The poor framing of the bottom two slides, however, is the same old problem: the “workaround” doesn't make any difference. Only one of the 6 slides is correctly framed; numbers 1 and 3 have a black bar on the right, number 4 has one at the bottom, and the software thinks that 5 and 6 are the wrong way round. This is no exception: it gets most of them wrong.
I have now had enough. I'll return the product. It's really disappointing that even big, supposedly reputable companies can bring such inferior software to market and refuse to do anything about it, not even to modify their advertising to conform with facts. I wrote to Paul Gravina:
Date: Sat, 7 Aug 2004 12:29:58 +0930
From: Greg 'groggy' Lehey <grog@lemis.com>
To: GRAVINA_Paul@canon.com.au

[Format recovered--see http://www.lemis.com/email/email-format.html]

Overlong lines.

On Wednesday, 21 July 2004 at 12:27:56 +1000, GRAVINA_Paul@canon.com.au wrote:
> Dear Mr Lehey
>
> Thank you for the reminder to answer your query about the product's
> colour depth capability.  I confirm that it does support 48 bit
> colour scanning.  I attach a document which explains the required
> settings.  Hopefully this will address your problem.  If it doesn't,
> please check the graphics software you are using to ensure that it
> supports 48 bit colour images, if you need appropriate software,
> please note that 48 bit scanning is supported by ArcSoft Photo
> Studio 5.5, which is included on the main setup CD-ROM supplied with
> the scanner.  Please advise if these suggestions don't resolve your
> problem.

Thanks for the feedback.  Yes, 48 bit mode works.  I'm just somewhat
surprised that it was so difficult to get this information.

> If you are still dissatisfied with the product, I reiterate that
> unfortunately we cannot do anything more to address your concerns at
> this time, and we would be happy to refund your money.

Thank you.  I've made it clear on several occasions that I do not want
to return the scanner.  However, your intransigent attitude to serious
defects in your product leaves me no other recourse.  Please let me
know how to return the product and get a refund.

I would like to reply to a point you made in your message of 16 July:

  Unfortunately, it seems clear that we are unable to satisfy your
  expectations with regard to the product.

Yes, this is correct.  The way you formulate it, however, suggests
that this is my problem.  It is not.  Canon deliberately raised these
expectations.  At
http://www.canon.com.au/products/home_office/scanners/scanners_low_medium_volume/canoscan9900f.html,
you still maintain:

      With a fast USB 2.0 Hi-Speed/FireWire (IEEE1394) dual interface,
      the CanoScan 9900F can capture reflective prints, 35mm
      filmstrips or slides, and up to 5" x 4" large format films at
      high-quality 3200 dpi optical resolution.  A comprehensive
      software package, including Adobe PhotoShop Elements 2.0 ensures
      ease of use and professional results every time.

This claim is either extremely misleading ("can capture" could be
interpreted as "can sometimes capture") or knowingly incorrect.  You
should remove from your advertising material any claims that this
scanner, as supplied, can scan slides.

I would like to take this opportunity to remind you, again, that a
workable solution to the problem would be to release product
specifications, as your competitors do.  This would enable programmers
more competent or motivated than your own to write functional software
for the device.

In the past, there was mention of a "workaround": leave the top left
and bottom right slide positions open, and the other six slides should
be recognized correctly.  This "workaround" does seem to work
marginally better than without, but I have yet to have the other six
slides correctly recognized.  The attached image shows one example:
the bottom two slides have been turned on their side and truncated, a
typical manifestation of the problem we have been discussing all
along.

| Greg's home page | Greg's diary | Greg's photos | Copyright |